For the last 8 months, AccuPixel has been providing a photogrammetry processing service that is part of an ongoing reverse engineering project taking large high-capital assets and digitizing them. But when an opportunity arose to take a harder look at the end-to-end process we grabbed it.
As we are entering into a new stage of technological development, new technologies, like photogrammetry and 3D printing, can feel like a replacement for older techniques and equipment. Unsurprisingly, new technology can push pre-existing technology and assets into obsoletion. But this move forward begs the question: what if we still like and want to use our older technology?
The Trouble with Classic Automotive Maintenance
Issues arise when our classic car or motorcycle requires a part no longer available. Photogrammetry, 3D Scanning, and 3D printing allow manufacturing to leave the factory and enter into the hands of the restorer. By scanning your old part and using a 3D printer a new replacement part becomes possible.

Additionally, this process allows us to do a side-to-side comparison between close-range photogrammetry, and handheld structured light scanning. Both Simon and Jose are inherently curious and want to know…what works best and what makes one method better or more suitable?
Replacement Parts
Scouring junk yards and online forums in search of a replacement part. We essentially confine ourselves to the finite availability of parts discontinued by the original manufacturers. Suddenly, finding a part, once available at the local auto parts store, becomes a strenuous task. And in a moment of nostalgia-driven insanity, Simon acquired a Yamaha TY250 needing a little tender and loving care. Quickly dismantling the motorbike revealed damage to the LH crankcase cover.
This has been the case for automotive collectors who can not find the parts their classic car or motorcycle needs.
The same technology used to design and build new models also offers solutions for those of us who still enjoy and use their nostalgic rides.
A Classic Bike Brought Back to Life
The LH crankcase cover is a) fragile and b) made of magnesium alloy and difficult to repair and c) no longer made. Replacement parts like this are considered unicorn grade. They just don’t exist anymore.
This is where reverse engineering, even with a damaged component, steps in.

What you need for Reverse Engineering
Photogrammetry and 3D printing are newer technologies. Nonetheless, as they have gained popularity, the price point has decreased and personal accessibility to the technologies has increased.
Consequently, we now have the capability to build a new LH crankcase cover in the comforts of your home office. To successfully perform reverse engineering, you’ll require a few essential items. We used a handheld scanner, reverse engineering software, CAD software and a 3D printer.
For comparison to photogrammetry, 3DF Zephyr was used to align the images.
The Process of Reverse Engineering


A high-level view of the process goes like this:
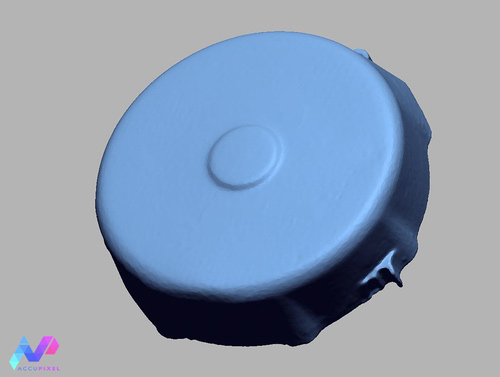
- Begin by scanning the target area using a handheld scanner for precise data acquisition.
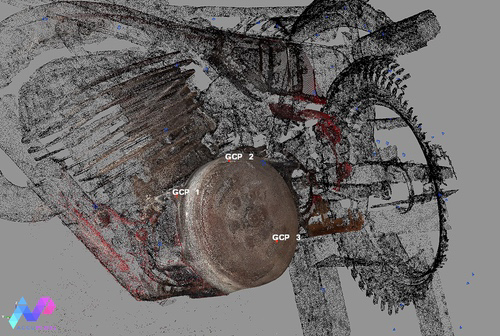
- Cover the same area with overlapping images to create a photogrammetry model with a dense cloud.
- Import the handheld scan’s dense cloud into Zephyr software for further processing with Photogrammetry.
- Using ICP in Zephyr align the two point clouds: the photogrammetry cloud scales and moves while the handheld scan remains fixed.
- Transfer the color and detail information from the photogrammetry cloud to the handheld data whilst allowing the photogrammetry data to inherit the accuracy of the handheld scan.
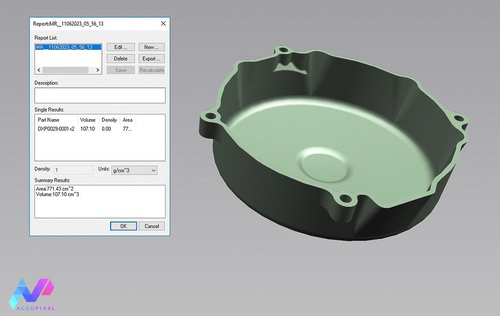
- Import the cleaned handheld-derived mesh into a CAD program for quality assessment and scaling validation.
- Extract surfaces, modeling in 3D, and defining the shape of the part based on the data.
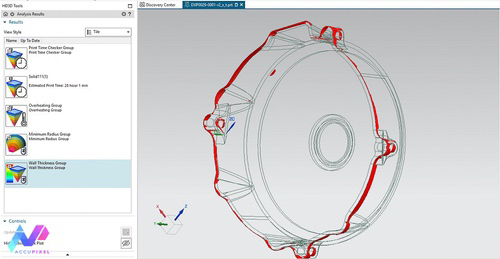
- Validate the CAD model for accuracy and perform digital fit trial alignment fit.
- Finally, export the CAD model in a 3D-printing-compatible format for manufacturing the replacement part and completing the reverse engineering process.
Material Options available for 3D Printing
Given that 3D printing is not limited to one material, the options of printing a part extend to grades of plastic and metals including steel, aluminum, or titanium. When using photogrammetry and 3D printing to reverse engineer a spare part, you have the option of spending more or spending less to determine the durability of your final product. Not only does this allow for the most cost-effective reverse engineering, but it also allows more flexibility in what you can create.
Photogrammetry and 3D printing are becoming more readily available. It is possible, that in the future a digital marketplace will be available and instead of going to the auto parts store, a user just downloads the 3D model of the part they need and prints it out themselves. Reverse engineering enables a more accessible and cost-effective creation of spare parts that have been discontinued or are difficult to find.
Conclusions
Even though technology is enabling the creation of new makes and models of automobiles and motorcycles, reverse engineering technology can allow more efficiency in the maintenance of classic cars/bikes.
Photogrammetry and reverse engineering offers a revolutionary solution to a multitude of problems.
Final Thoughts on Reverse Engineering
At Accupixel, we dedicate ourselves to discovering new applications in this ever-expanding field. Whether it is mapping a cultural heritage site for preservation purposes, using a drone to scan terrestrial infrastructure, or finding a way to get that 67’ Corvette running again we are finding solutions to everyday problems.
Finally, if you have a reverse engineering project and are considering photogrammetry and/or structured scanning as a method, or have a classic part needing some love and would like to know more, then please use the contact us page to get in touch.
Update – Production Part Printed
The production part printed and finished ready to fit has arrived. The finish direct from the printing process, with its shot peen finish, is a subtlety different result from the cast original:

Different to the original? Yes…but its a stunning result that has come more or less straight from the printer.
A trial fit of the part onto the crankcase was inevitable as it shows off the old and new and highlights the precise fit and matching of the new part:

Some extended testing for stability and durability will be underway shortly as soon as the engine – which is currently undergoing a rebuild after finding the gearbox output bearing had seen better days – is complete.
We are delighted with the result and its all helping to extend the life of a motorcycle for which parts like these are just impossible to find.
![]() Keep up with us on LinkedIn here
Keep up with us on LinkedIn here
![]() Like and Follow us on Facebook here
Like and Follow us on Facebook here
![]() Subscribe to our Youtube here
Subscribe to our Youtube here
2 thoughts on “Reverse Engineering: Creating Discontinued Spare Parts with Photogrammetry, 3D Scanning, and 3D Printing.”